Want a natural, glowing complexion without spending a fortune? A DIY honey face cream with raw honey and propolis might be your answer. This homemade cream is simple to make, budget-friendly, and packed with skin-loving benefits. In this guide, I’ll walk you through everything you need to know to create your own face cream at home. Let’s dive in!

Why Use Raw Honey and Propolis for Skincare?
Raw honey and propolis are nature’s skincare superstars. They’re packed with nutrients that nourish and protect your skin. Unlike store-bought creams, this DIY version skips harmful chemicals. You get pure, natural goodness instead.
What is Raw Honey?
Raw honey is unprocessed and unfiltered. It comes straight from the beehive. It’s rich in antioxidants, enzymes, and antibacterial properties. These help hydrate skin, fight acne, and reduce redness. Plus, it’s a natural humectant, meaning it locks in moisture.
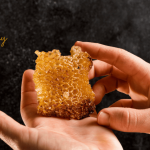
What is Propolis?
Propolis is a sticky substance bees make to seal their hives. It’s loaded with antioxidants, vitamins, and anti-inflammatory compounds. Propolis can soothe irritated skin, reduce acne scars, and even fight signs of aging. It’s like a shield for your skin!
Benefits of Honey and Propolis Face Cream
Why combine these two? Together, they’re a powerhouse for healthy skin. Here’s what they do:
- Hydrate deeply: Raw honey keeps your skin soft and supple.
- Fight acne: Both ingredients have antibacterial properties to clear blemishes.
- Reduce inflammation: Propolis calms redness and irritation.
- Brighten skin: Antioxidants in honey and propolis fade dark spots.
- Anti-aging: They help smooth fine lines and boost collagen.
Ready to make your own? Let’s get to the recipe!

Ingredients for DIY Honey Face Cream
You don’t need fancy tools or rare ingredients. Everything is easy to find. Here’s what you’ll need:
- 2 tablespoons raw honey: Choose organic, unfiltered honey for best results.
- 1 teaspoon propolis extract: Look for high-quality, alcohol-free propolis.
- 3 tablespoons shea butter: This adds creaminess and deep moisture.
- 2 tablespoons coconut oil: It softens skin and adds a smooth texture.
- 1 tablespoon aloe vera gel: Soothes and hydrates sensitive skin.
- 5-7 drops essential oil (optional): Lavender or tea tree oil adds a nice scent and extra benefits.
- 1 teaspoon vitamin E oil: Boosts skin repair and acts as a natural preservative.
Where to Find Ingredients
Most ingredients are available at health food stores or online. Check local farmers’ markets for raw honey and propolis. Amazon or iHerb are great for shea butter and essential oils. Always choose high-quality, organic products for the best results.
Tools You’ll Need
No need for expensive equipment. Here’s what to gather
- A small heat-safe bowl
- A saucepan (for a double boiler)
- A whisk or spoon
- A clean glass jar for storage
- Measuring spoons
Step-by-Step Recipe for Honey Face Cream
This recipe makes about 4 ounces of cream. It’s enough to last a few weeks. Follow these steps carefully for a smooth, luxurious cream.
Step 1: Set Up a Double Boiler
Fill a saucepan with 1-2 inches of water. Place a heat-safe bowl on top. Make sure the bowl doesn’t touch the water. Heat the water on low to create gentle steam. This melts the ingredients evenly.
Step 2: Melt Shea Butter and Coconut Oil
Add the shea butter and coconut oil to the bowl. Stir gently as they melt. This takes about 3-5 minutes. Keep the heat low to avoid burning the oils. Once melted, remove the bowl from heat.
Step 3: Add Raw Honey and Propolis
Stir in the raw honey and propolis extract. Mix well until fully combined. The mixture should look smooth and glossy. Propolis can be sticky, so keep stirring to blend it evenly.
Step 4: Mix in Aloe Vera and Vitamin E
Add the aloe vera gel and vitamin E oil. Whisk gently to combine. If you’re using essential oils, add them now. Lavender is great for calming skin, while tea tree fights acne. Stir until everything is blended.
Step 5: Cool and Store
Let the mixture cool slightly, but don’t let it harden. Pour it into a clean glass jar. Seal the jar tightly and store it in a cool, dry place. Your cream is ready to use!
How to Use Your DIY Honey Face Cream
Using your new face cream is easy. Follow these tips for the best results:
- Cleanse first: Wash your face with a gentle cleanser.
- Apply a small amount: Use a pea-sized amount for your whole face.
- Massage gently: Rub the cream in circular motions until absorbed.
- Use day or night: It’s great as a daily moisturizer or overnight treatment.
- Patch test: Test on a small area of skin first to check for allergies.
Pro tip: Apply it after a warm shower. Your pores will be open, and the cream will sink in better.
Why This Face Cream Works for All Skin Types
This cream is versatile. It works for dry, oily, sensitive, or combination skin. Here’s why:
- Dry skin: Honey and shea butter deeply hydrate.
- Oily skin: Propolis and tea tree oil control excess oil.
- Sensitive skin: Aloe vera and lavender soothe irritation.
- Aging skin: Antioxidants in honey and propolis fight wrinkles.
I’ve used this cream for months, and my combination skin loves it. It feels light but keeps my face soft all day.
Tips for Best Results
Want to make your cream even better? Try these
- Store properly: Keep the jar in a cool place to prevent melting.
- Use within 2 months: Natural ingredients don’t last forever.
- Customize it: Add more honey for extra hydration or propolis for acne-prone skin.
- Sanitize tools: Clean your jar and tools to avoid bacteria.
- Shake before use: Ingredients may separate slightly over time.
Common Mistakes to Avoid
It’s easy to mess up if you’re not careful. Here are some pitfalls to watch out for:
- Overheating: High heat can destroy honey’s nutrients. Use low heat.
- Using processed honey: Only raw honey has skincare benefits.
- Skipping the patch test: Propolis can cause allergies in rare cases.
- Adding too much essential oil: A few drops are enough. Too much can irritate skin.
Why Make Your Own Face Cream?
Store-bought creams are expensive. They often contain fillers, fragrances, or chemicals. Making your own is cheaper and lets you control the ingredients. Plus, it’s fun! You’ll feel proud using something you made yourself.
For example, a high-end honey-based cream can cost $50 or more. This DIY version costs about $10 for the same amount. You save money and get better quality.
Safety and Precautions
Natural doesn’t always mean safe for everyone. Here’s how to stay safe:
- Allergies: Test for sensitivity to honey or propolis.
- Propolis caution: It can cause reactions in people allergic to bees.
- Cleanliness: Always use clean tools to avoid contamination.
- Consult a doctor: If you have severe skin issues, check with a dermatologist.
Frequently Asked Questions
Can I use this cream every day?
Yes! It’s gentle enough for daily use. Start with once a day to see how your skin reacts.
How long does it last?
About 1-2 months if stored properly. Vitamin E helps preserve it, but use it fresh for best results.
Can I add other ingredients?
Sure! Try rosehip oil for extra anti-aging benefits or jojoba oil for oily skin.
Where can I buy propolis?
Health food stores, local beekeepers, or online retailers like Amazon have it. Look for pure, alcohol-free propolis.
Final Thoughts
This DIY honey face cream with raw honey and propolis is a game-changer. It’s simple, affordable, and works wonders for your skin. You don’t need to be a skincare expert to make it. Just follow the steps, and you’ll have a luxurious cream in no time.
Try it out and see the difference. Your skin will thank you! Have you made a DIY face cream before? Share your tips or questions below. Happy crafting!
For more information, visit , https://besthoneytobuy.com/